Monday, April 25, 2011

My EGL Transformation

First of all, I never meant to go this long between posts, but many late nights (watching terrible movies) and working on three cosplays has had me either really sleepy or busy. 
However, I wanted to post a little more in depth about the transformation post I did on EGL.  So, this will be the same things just with more information.
This is me on a, more or less, daily basis, except for the fact that my hair is naturally curly, and when it's curly I don't style it like I do when I have it straightened.  On a side note, the top cost me $5 at the Wet Seal, and the jeans cost me $6 or $7 at Goodwill.


I hope no one minds, but I left out my "just out of bed" picture (because it's pretty awful).  However, this is me out of the bath with clean, dry and gelled hair.  All I do is run some Garnier Fructis Cream Curl Sculpting Gel through my hair, when wet, and let it dry!  I like to start with dry hair if I plan on experimenting with my hair or going for a poofier style, which I was trying to do both today.
 
 All I did with this was make a 1/2 ponytail and back-comb my hair right up by my hair tie.  Then I pinned two portions forward, and pulled the remaining ponytail bit back in 2 bobby pins then added the flowers and headband.

This is my make-up and I really have a range between expensive and cheap!  From left to right, top to bottom this is what I have: 
Sephora Lash Plumper-Black ($12)
L'Oreal Paris Double Extend Eye Illuminator ($10.95)
Target-brand eyeshadow brush (about $4)
CoverGirl Perfect Point Plus in Black and Silver (about $5 each)
Lipstick I didn't actually use
CoverGirl Cheekers Pretty Peach ($4)
Sephora Aspen Summit eyeshadow (FREE!)
Sally Girl Baked Eyeshadow Purple and Pink ($1.99 each)
Maybelline Natural Accents Phantom Grey ($4.99)
Mary Kay Telescoping Brush (FREE!)  
Mary Kay Bronzer - I don't know if they make this anymore.  I use it on my cheeks
Physician's Formula Gentle Concealer Green ($5.69)
Bare Minerals Powder Fairly Light ($28)

I personally wouldn't recommend the Physician's Formula concealer to everyone.  I use it because I have some red scaring around my mouth and nose from cold sores.  If you have something like this or consistent red spotting, buy this!  It works!
Also, my Bare Minerals is love!  I have very sensitive skin and break out in dry patches easily, this doesn't cause any of those problems!

My make-up and two very flattering pictures of my face!  I want to point out that I do smoky eyes, and when I do purple I like to do my outer corner in black.  I just wanted to point that out, as to say black eyeshadow can look really great if you use it carefully!
Finally, here I am in my cute clock dress.  I love this dress, and I love full-shirring.  I'm apparently the only thin person who feels this way (but it may have to do with being thin and having a small chest).

Also, that's what I did with my detachable bow (see it on the back, there)!  I felt like the back of the dress was too plain, and this was the perfect quick fix!

Tuesday, March 15, 2011

Review for Bodyline L191 and BAG120

It was requested, awhile back, that I review one of my favorite Bodyline pieces: L191, or my Heart Chocolate Sweet Biscuit JSK.  Since I have the bag, too, I'll be sharing a few words on that.


Shown with Detachable Bow

Back View
This particular JSK is listed as made from the material "Cotton Other" on Bodyline's website.  I'm not sure what that means, but it is a heavier cotton cloth.  I believe that if you had a petticoat that wasn't stiff enough, the dress would cause it to droop.  With a racer-back bra (or one of those little discs you put on a bra to turn it into a racer-back) this dress looks really nice in the summer time with no blouse.
I've washed this piece several times, with no problems.  To dry I just hang upside-down to air dry.  It irons, alright, as well.  Not great, because of the thick fabric, but alright. 
Th back is shirred and has corset lacing.  However, the ribbon that was used for the lacing seems really cheap and it looks like it should tie at the bottom.  Also, the ribbon is really, really long.  I'm not sure if it's because I'm thin, and don't use much lacing, or if the ribbon is just really long.

The waist ties are beautiful, and (if you're really patient about it) tie very nicely.  However, because of the way the corset lacing is, it tends to get stuck in my waist tie bow if I try and tie it myself.

The waist ties close-up are so beautiful with so many lovely details.  It seems like just enough, while not going over the top.
The JSK uses a zipper closure, under the left arm.  This is nice, in that it keeps the zipper very nicely hidden.  However, due to the style of zipper it tends to rub on the underside of my arm.  It's more annoying than painful, but I generally have a red mark under my arm at the end of the day, even when I wear a blouse.

 I also wanted to point this out.  I want to make it very clear that the dress did not come with this rip.  However, I wanted to point it out and the situation that caused it. 
The first time I wore this dress, the zipper got caught on that cloth part when I went to zip it.  It got stuck, BADLY.  To unstick the zipper, I had to cut off that particular piece, and pull it out of the zipper.  Now, I don't know if this is a result of random chance (lucky me!) or if it has to do with how the zipper is sewn in.  If you notice, that cloth piece around the zipper folds over a bit there.
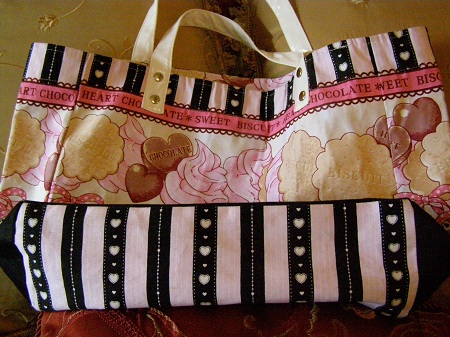
The print on this is gorgeous!  All soft colors, with details that resemble the lace on the dress.  Also, you can't see but I tried my hardest to get a picture, the background behind the cookies is not white.  It is actually a very, very light yellow with white dots on it.  People probably can't see it when you wear it, either, but it's such a pretty little detail, and I didn't notice it for a long time.


The bow detailing is also very lovely.  The dress has two small bows, where each strap connects to the front of the dress.  It also has two detachable bows, the smaller of which I have not pictured.  They're both really nicely made, and if you like to wear large head bows, the smaller of the two could, probably, be easily converted for that purpose.
This is the sort of lace you'll see most places on this dress.  It's not soft, but it's not really scratchy either.  It's not uncomfortable or itchy, at all.  It's more of an off white than a white, too.
This is the lovely lace on the bottom.  It's a longer piece of more stiff lace, with a little line of short puffy heart lace sewn on the top.

However, I noticed this problem with my lace.  It's cut, more or less, wrong and a bit sloppy.  Some places are considerably worse than others.  In fact, some places the lace is trimmed correctly.  As much as I love this dress, this is my second biggest peeve about it.
My biggest peeve with this dress is this underarm ruffle.  I have tried ironing it a million times, but due to a combination of the thick fabric and seeming like there is just to much fabric in the ruffle, I can't get it to lay flat.  Right now, I have it hanging in the bathroom to try and steam the ruffles down.


Really quickly, here's the bag.  It's a nice good size, but unfortunately no sort of pockets or dividers.  Also, the straps seem really cheap, and weak.  When I use this bag, sometimes I worry that the weight of the things in my purse could cause them to tear.  However, it is nicely lined.  I like it because it matches my dress, but it's by no means a must-have.

Final Rundown:
Bodyline L191 - Heart Chocolate Sweet Biscuit JSK
Pros:
-Nice heavy fabric
-Top of the dress made so it can be worn with or without a blouse
-No problems with washing
-Beautiful detailing on the waist ties
-Nice colors and details in the print along the bottom
Cons:
-Some detailing looks cheap (mainly corset ribbon)
-Zipper rubs on arm
-Poorly cut lace
-Ruffle won't lay flat
Overall Rating: 7/10

Bodyline BAG120 - Matching Tote
Pros:
-Good size
-Nicely lined
-Matches the dress!
Cons:
-Straps seem cheap
-No dividers
Overall Rating: 5.5/10

Also, I would like to point out that, as of this posting, on Bodyline's site the prices are:
JSK - $31
Bag - $6

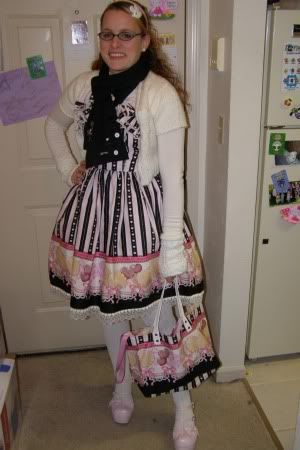
Me, wearing the reviewed pieces


Friday, March 11, 2011

Clearance Find!

Since one of my main motivations behind this blog is saving money, I had to share this!


I found this white floral print tights on the rack of clearance tights and socks at Target, and they were marked down to $4.90.  They had the pink flowers on white, and also had blue flowers on black (I passed on those, since I don't wear much blue).  At the Target I was at, the rack was almost hidden away so you may need to look really hard for these.

Here they are worn (sort of).  You can see that they also incorporate a little polka dot pattern.  Also, the packaging lists them as sheer, but I thought that they kept the white color really well!


Sorry for the blurry!
I had to use them in an outfit shortly after I got them (this was 2 days later).  I love 'em!

I'm hoping it stays sunny enough that I can post a review for a Bodyline item, next week.  It's been really cloudy, and my apartment is pretty dark so if there's not enough natural light I can't get very good pictures.  I've got my fingers crossed that it'll be sunny this weekend so I can get it done!

Finally, I wanted to apologize.  It is my intention to update on either Monday or Tuesday and I've been having a really hard time making that happen.  I picked up a lot of extra hours in the last few weeks and a lot of them have been working with a new co-worker who is not a nice person and seems to enjoy irritating the crap out of me and one other co-worker.  This has left me feeling really crappy and when I have days off, I just want to destroy things in mass numbers in video game form (my favorite things are Geth and Darkspawn). 
In addition to this, the last few weeks I was trying to bludgeon my way through another Dragon Age play-through before Dragon Age 2 came out, and then Dragon Age 2 came out and that's all I've been doing this week. 

Friday, March 4, 2011

Tasty Food!

I just wanted to post up some pictures, and ideas for some pretty and tasty food!  All of this was made and photographed this very morning!

Strawberry Cheesecake....?
 This is something I put together for Husband's bento lunch this morning.  When I have the time, I love to make onigiri on Fridays, because I normally have more time.  This particular onigiri, though, has something extra special inside.  The price of fruit FINALLY started coming down at the grocery store, so this one is filled with strawberries and cream cheese.  Therefore, I have decided to call it a Strawberry Cheesecake Onigiri!  I sprinkled it with colored sugar, just to add some extra sweet. 

Now, onto 2 of my favorite things, and one of them very new.....
.... Whole sweet red beans in syrup and that new Dannon Greek.  When I first picked up some Dannon Greek, I didn't realize they made plain (since the grocery store was out).  Last time I went shopping, though, they had some, and I knew just what I wanted to do with it!  I LOVE sweet red beans with plain yogurt, I even make smoothies using that combination!  This was a no brainer. 

Look at the pretty breakfast it makes!  Just stir those little guys right into your yogurt for a fantastic taste experience.  You get a good mix of sweet, sour and umami. 
The only challenge here is finding the red beans in syrup.  I've only found one Asian market in my area (which is a loose term, since it's about 45 minutes away) that carries it. 

So that's it.  Depending on how my time goes this weekend, I'm hoping to post a review for a Bodyline item next week!

Tuesday, February 22, 2011

Earring Rack & Jewelry Holder

I want to preface this post by saying I know that this style of earring rack isn't that original.  My sister made something similar when I was in elementary school, even.  This is just my method and personal twist.

Supplies You Will Need:
-Plastic Cross Stitch Grid
-Ribbon (around 5/8" wide) - Preferably a new spool
-Copper Wire (mid-gauge size)
-Sewing Needle
-Thread to match Ribbon
-Wire Cutter - Jewelry Tool
-Needle nose Pliers - Jewelry Tool (not pictured)
-Round nose Plies -Jewelry Tool
-Scissors
-OPTIONAL - Sparkly Bits or Cabochons (and E6000 glue)
-OPTIONAL - Paperclips/Binder clips
To start out, cut your cross stitch canvas to the size you want.  For this tutorial, though, I recommend keeping it square or rectangular.  Make sure you trim off any little bumpy bits that may be left behind.
Next, we're going to play with copper wire and make hooks!  You're going to want to cut pieces approximately 1-2" long (I don't actually measure anything, so I'm not exactly sure how long mine were). 
Then you're going to want to take that piece, and fold it in half.  You may need to use your needle nose to help flatten it.  It should look something like this, now:
Next, take the wire piece, and put it all the way on the low end of the round nose pliers, with a bit of a tail sticking out. (vertically, like shown above).  Use your needle nose pliers to take that tail, and bend it around the round nose. You should have enough plus a LITTLE extra to make it around the rounded part.
Then, determine how long you want the hook to be.  Once you know that, hold the wire with the narrow end of the round nose and pull around in the opposite direction of the first hook using the needle nose.
And then, because that's kind of hard to explain, this is what your finished hook should look like!  Take your wire cutter and trim off any little tail pieces still hanging off the small end of the hook.  Determine how many hooks you need and repeat (I put one hook through every 5th hole).

To put them onto the canvas, simply pop them into the grid (DO NOT use the 1st or 2nd grid piece on either side).
 Pinch the small hook closed with your needle nose pliers, and you've got a hook on your racking!
Once you're ready for the next step, you should have a line of little copper wire hooks, like this one!
Now, we're going to start sewing!  Take and knot off your thread (I was using a thin, gauzy ribbon so I knotted my thread 3 or 4 times, to get a nice large knot) and thread your needle. 
Starting at the MIDDLE of the TOP start stitching on the ribbon.  Do not cut the ribbon, just leave it on the spool.  I recommend using the grid as a guide for your stitches.
When you come up to a corner (within 2 or 3 holes) knot off before you sew it.
When you get to the corner, fold the ribbon over onto itself, making a little fold.  Sew it in place.  The very corner piece of the grid will probably stick out, but that can be remedied later.
Continue all the way around, using the same method on each corner.  I recommend taking your time and being patient along the bottom because your ribbon and thread will get caught on the hooks.
When you get back up to the top, carefully line up the ribbon you're sewing on to the ribbon you started with.  Once you get back to the middle (you may want a little bit of overlap) tie off and cut the ribbon!
If at any point, you're having difficulty keeping the ribbon flat where you need it, use a paperclip or binder clip to hold it in place.
When you're done, it should look something like this.  If you look, you can see that the corners on the grid are still sticking out from under the ribbon.
Next, determine approximately were the middle on the top of your grid is.  Take a piece of 1 1/2" wire and crease  it lightly at the middle.  Center the crease above the middle of the grid, and stick the ends though.  Using your needle nose to bend the ends up.
Trim off those nasty corners (I suggest using a small precise scissor so you can get as much off as possible.  Then add something to cover the seem where the ribbon meets at the top.  I just made a simple bow and sewed it on.
OPTIONAL - Using E6000 (or some other epoxy based glue) glue on any sparklies, cabochons or any other bits and bobs you'd like on the ribbon.  The cabochons were pulling away at the corners, so I just used a paperclip to help keep them flat against the earring rack.  Let dry for at least 12 hours!
Here it is all finished.  I didn't put much on it because this one isn't for me, it's a gift.  However, with lots of goodies, your earring rack will look like this:
That one's my original I made a few months ago.  So, in addition to being able to hold LOTS of stuff, it looks pretty on the wall!